LIVING, Recipes, baking-in-france, baking-in-the-vendee, bread and hot chocolate, bread. home-made bread, European style milk bread ingredients, home made bread, homemade bread, how do I make bread, how to bake bread, how to bake brioche style bread, I-love-baking, is milk bread just brioche, milk bread, why is milk bread so good, wintery bread
Photography Tips 3: how to prepare images for the Internet
Following our articles about Food Photography and Social Media photography this third and final photography tip focuses on how to optimize your images for the Web. While this tip is for the more advanced user, we encourage you to explore the techniques described here. But we'll certainly include tips and tools to take an easier route for (almost) the same result: beautifully cropped and optimized images that are accepted by social media entities and look great on your website with minimum loading time.
Good photography is a powerful business tool. It's also FREE!
In our image driven online world, memorable photographs are essential.
In our image driven online world, memorable photographs are essential.
Image optimization explained
In offset printing (on paper), the image used is of the highest possible quality, usually saved as a PNG, short for Portable Network Graphics, a file type that allows for a full range of color and better compression for the purpose of printing. The image has lots of pixels, and pixels are the millions of dots that make up the picture.
On the Internet, where most of our modern marketing happens now, the opposite is true. For online use, it's important for images to be optimized. It means an original image is reduced both in size and in pixels as much as possible without losing quality on screen. This is necessary to:
- fit perfectly into the space for which the image is intended
- load in a reasonably fast amount of time for the web-user
The purpose of social media for business is to engage the user. In addition to posting only relevant, high quality content to your business feeds, make sure it's a snug fit, in size and in shape, within social media's predefined spaces.
To optimize an image for the Internet, in other words to adjust it for optimal online use, two steps are needed (note: some software allows for both actions at once. We'll share some examples u below.)
1. Step One: sizing the image or image cropping
We cannot stress enough how important it is for your business presentation that the images and ads (or assets) you use, fit into their intended space. An absolute don't is to create an image that cuts off the text of an e.g. event announcement or menu presentation once it is uploaded and saved to Facebook. Why does it matter? Because you're losing potential customers. Many people actually won't click through to see the whole thing. The purpose of scrolling is to do it quickly, after all. You want all of the text of your ad to be visible with minimal effort from the user.
In addition to posting only relevant, high quality content to your business feeds, make sure it's a snug fit within social media's predefined spaces. We will reiterate this until the cows come home! Why? Applying the correct techniques will bring your "high street window" from amateur to professional. It costs nothing... just time. When your feed looks professional, it is more eye-catching and the user will slow their scrolling finger to see it. Which translates to sales.
What this means is that one image must be cropped from the original for each and every different purpose. Your website may demand different predefined sizes. You can use the square 1090 x 1090 image on Facebook as well as Instagram (Pinterest likes it too), but a 1200 x 630 resolution works only for Facebook (updated for 2020), not Instagram. Resolution means the number of pixels per size... you could show e.g. 100x100 image as 1090 x 1090 but you would actually block-y as such that you can see the pixels - which is terrible. If you are putting an image on Instagram at 1090 x 1090 (updated for 2020), but you upload a 300x300 image, it's the right shape, but your resolution will be too low.
Do not try to use social media sized images on your website to save time, unless your website is set up correctly or accepts these image sizes. We run into these issues all the time in our research, or when we're asked to check a website/ social media feeds to analyse where a client can do better: images that are too small filling a space that is too large, stretching the image out of all proportion and often making them grainy; or an image that is too large squished into a space that is too small.
Just say no! Take the time to do it right. Below are images and examples of software (all open source) that explain the first step to image optimization: image cropping. To explain every step of the process would be impossible, as every software is different. It's a matter of downloading and installing any one or all of them, and to learn from the software directly. We are considering an in-person demonstration and if you'd like to be a part of that, please do let us know in our Facebook group.
In this first action to image optimization, you have the liberty to frame the subject any way you wish (see below example of butterfly image). By changing the aspect ratio i.e. cropping it to fit into a predetermined size (which you can feed into the cropping software), the subject will be closer or zoomed-in, and the subject can be moved around to fit your needs e.g. to add text and shadows in subsequent layers. Layering your advert is important to edit in case you make a spelling or other mistake, and also to help make the ad "pop" more. Exercise: in the five image samples below, can you tell the difference between a "flat" image and those properly layered with shadows? (Hint: two of the examples are flat and two have layers, and one has no added layers or text.)
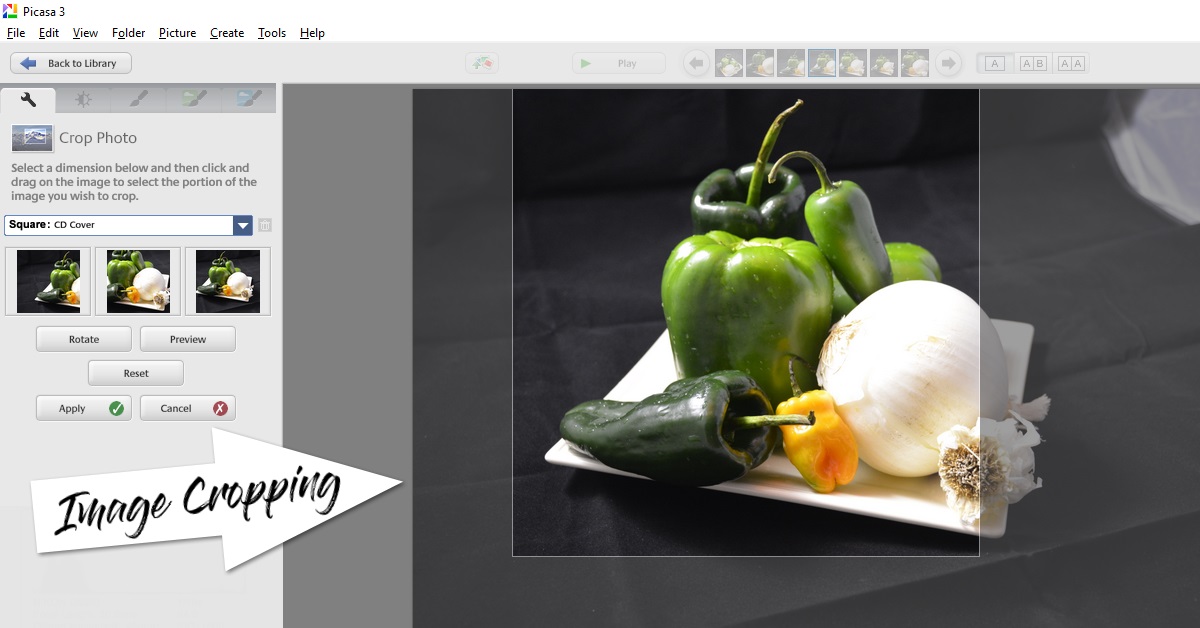
The original image above, at full resolution, is 6000 x 4000 (in pixels or PX). To prepare it for social media, we have changed the aspect ratio to 1:1 or cropped it to a shape of 1084 x 1084, ideal for both Instagram and Facebook. The software demonstrated here is "picasa" by Google. Sadly, this software has been replaced by "Google Photos" now, a software that allows the basic steps of image editing. It is very user friendly. Use it to navigate and learn the process of optimization.

In the above example we used an open source (free) software called "paint.net (link is getpaint.net)". It is more complex, offers many features and works great for image editing. In the first example, the cropping tool is on top of the image. With the 'paint' software, the image is behind the cropping tool so you can move the image around within the space to position the subject. Here, the next step in the optimization process happens upon saving the image as a JPEG or PNG file.
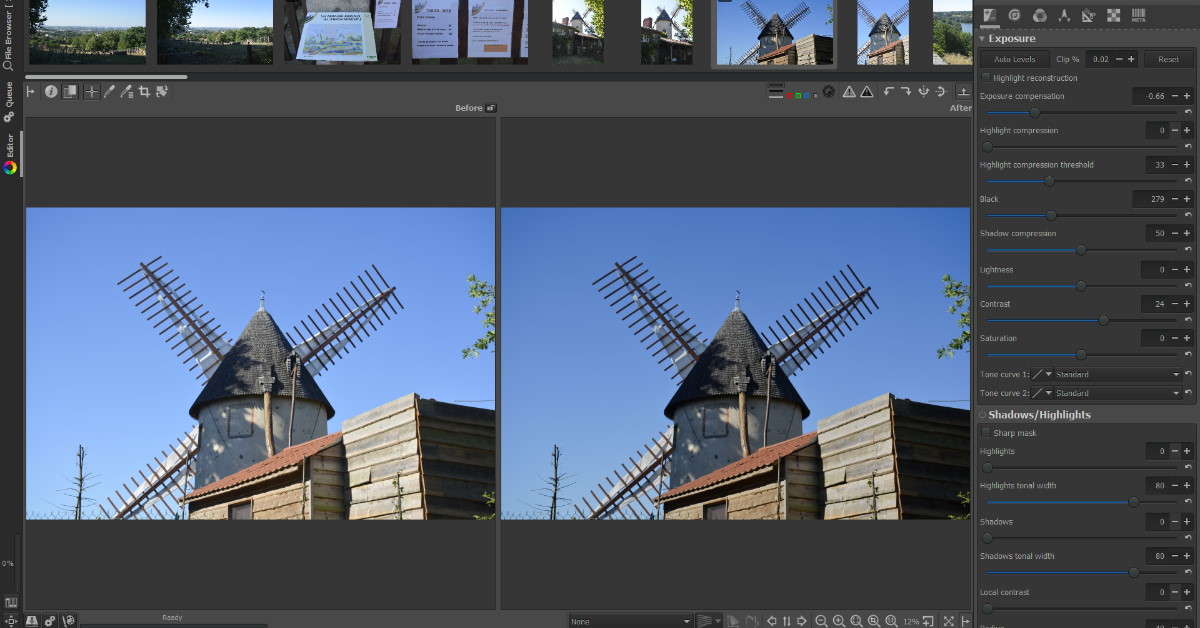
The above software screenshot shows "raw therapee". It is also free to use (or open source software) but it works more like Lightroom. it is complex and there is a huge learning curve, but it is wonderful for image processing, etc. we understand why this is considered the preferred photo processing software for professionals. Lightroom, is quite expensive, even on a monthly basis. This tool is definitely worth exploring, but it takes more time to navigate. powerful!
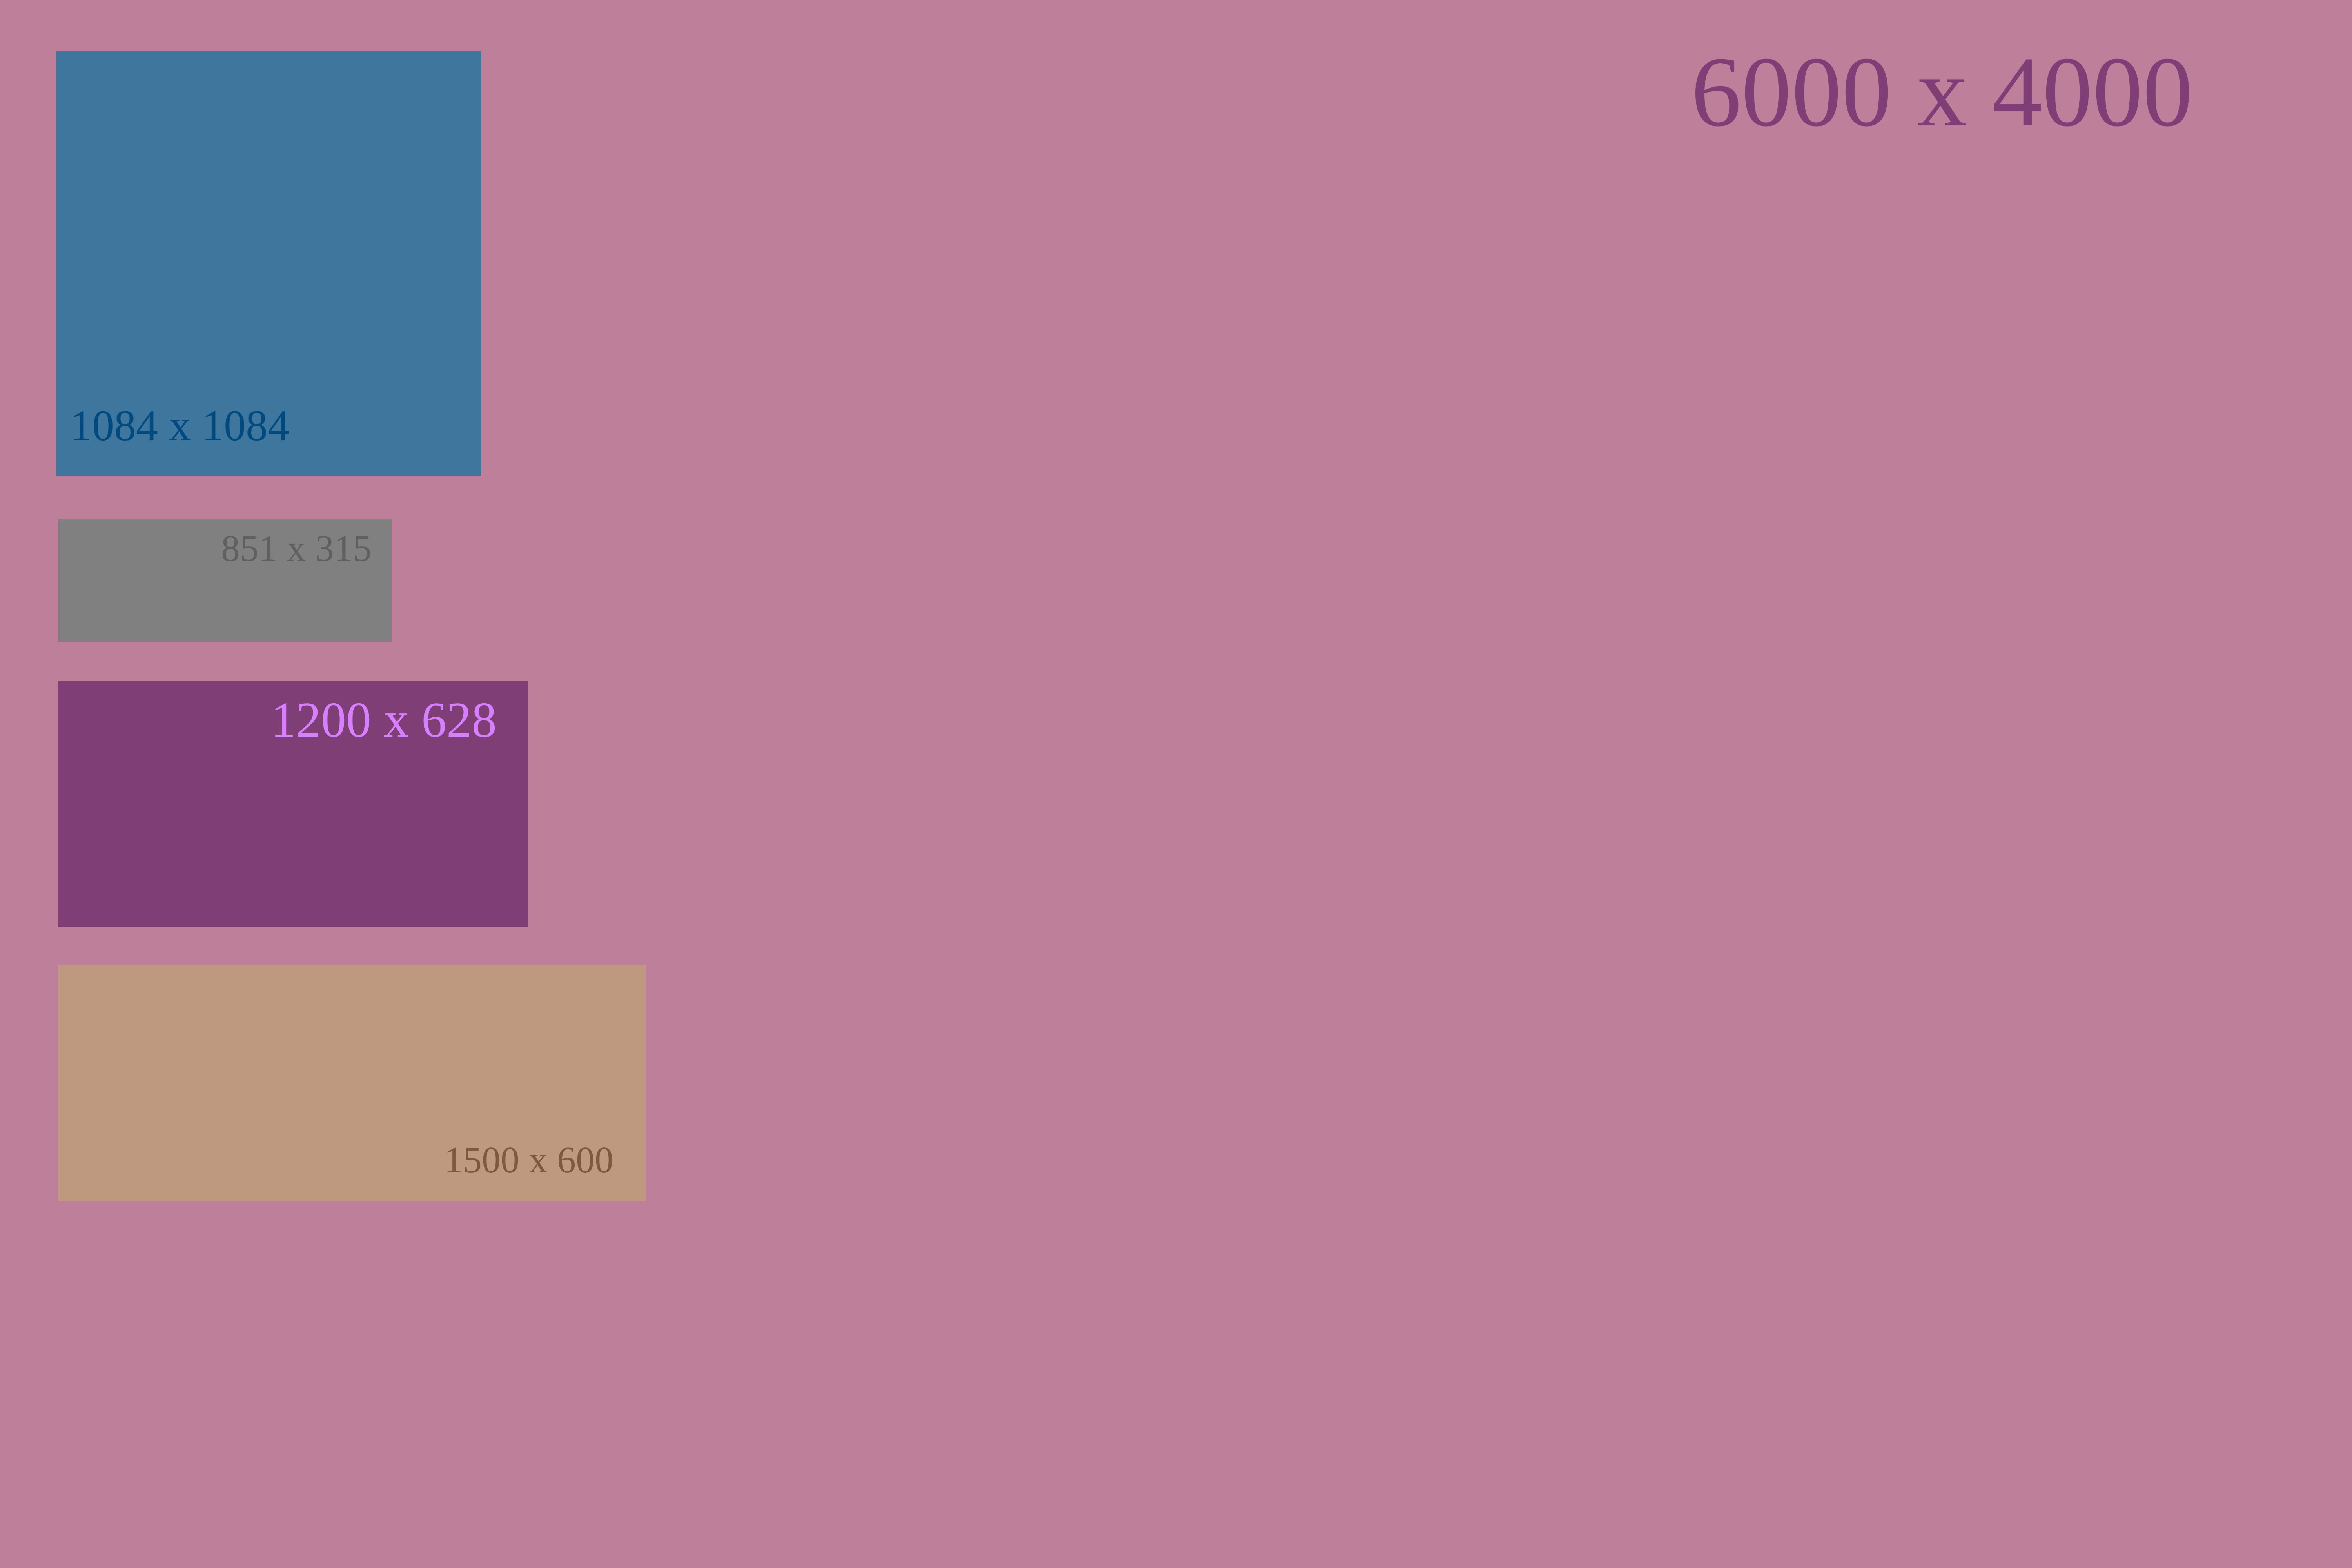
NOTE UPDATE anno 2020 the new social media sizes are 1200 x 630 (FB) or 1090 x 1090 (FB + IG + Pinterest) -- the header size for FB at 851 x 315 is still correct
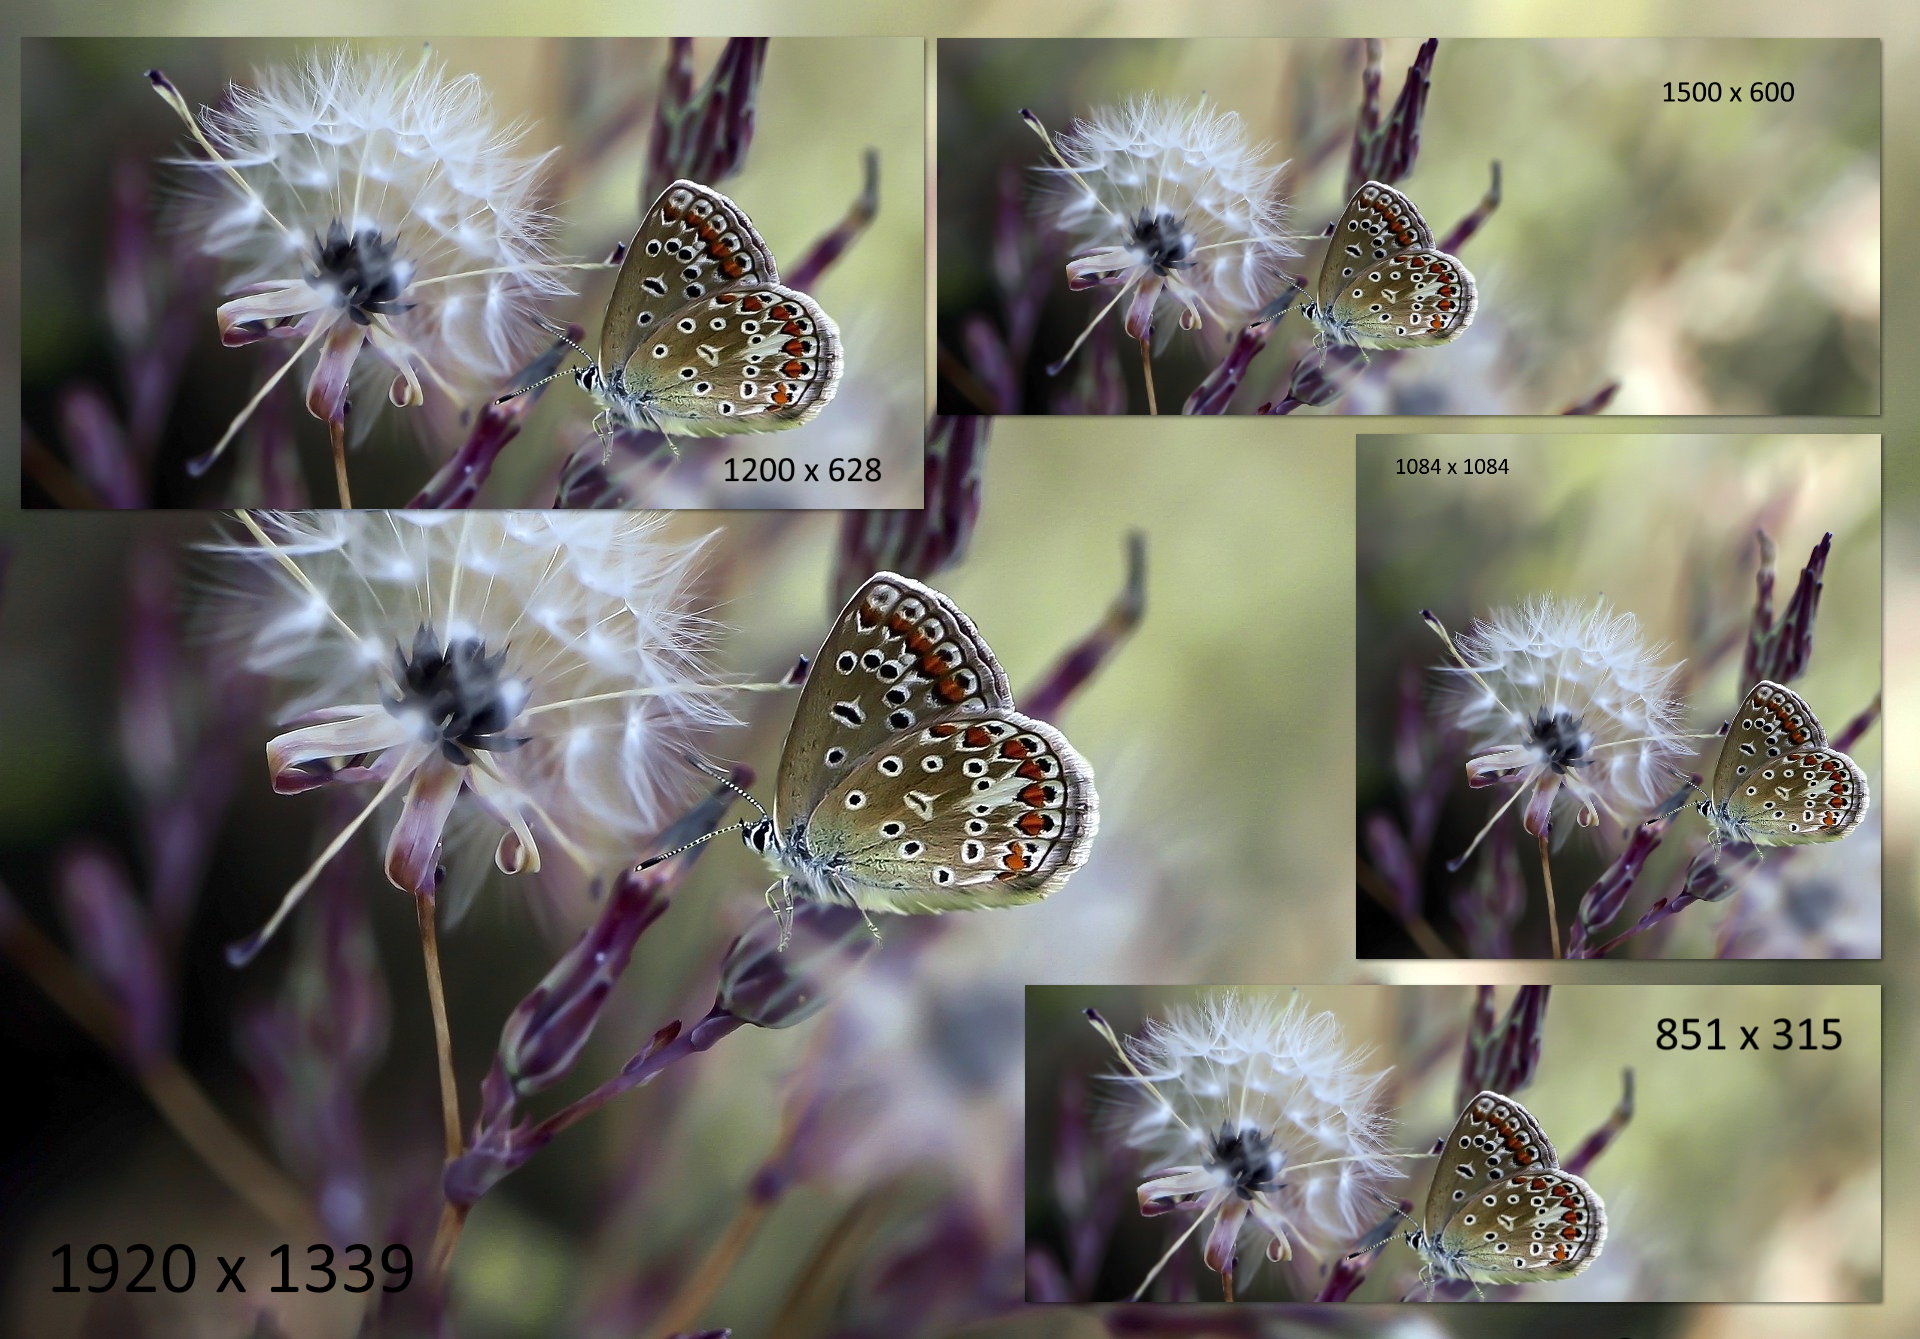
NOTE UPDATE anno 2020 the new social media sizes are 1200 x 630 (FB) or 1090 x 1090 (FB + IG + Pinterest) -- the header size for FB at 851 x 315 is still correct
2. Reducing image quality
After step #1, while the image is reduced in pixels through cropping, its quality is still too high. In the second and final step to image optimization, the image quality is much reduced. This action is done simply by saving the image to a lower quality that is still acceptable for use on the Internet - whether it be website or social media.
There is definitely a threshold. On a website, an image that is megabyte-sized will load agonizingly slowly. It's like watching a pot of water boil. Social media platforms have their own threshold. The trick is to find that ideal spot, the point where you see the image quality go from crisp to slightly blurry. That is the happy spot of image optimization! Once uploaded to a website or social media, the image will not only look nice, it will load well for the Internet user.

In this example after cropping the butterfly image to 1200 x 628 and saving it at 100%, the image is still 540KB (kilobytes) which is much better than an megabyte size image, but not reduced enough in quality for Facebook use or website use. If this were uploaded as is, Facebook would automatically take control of it by reducing the quality for you, which doesn't always end well.
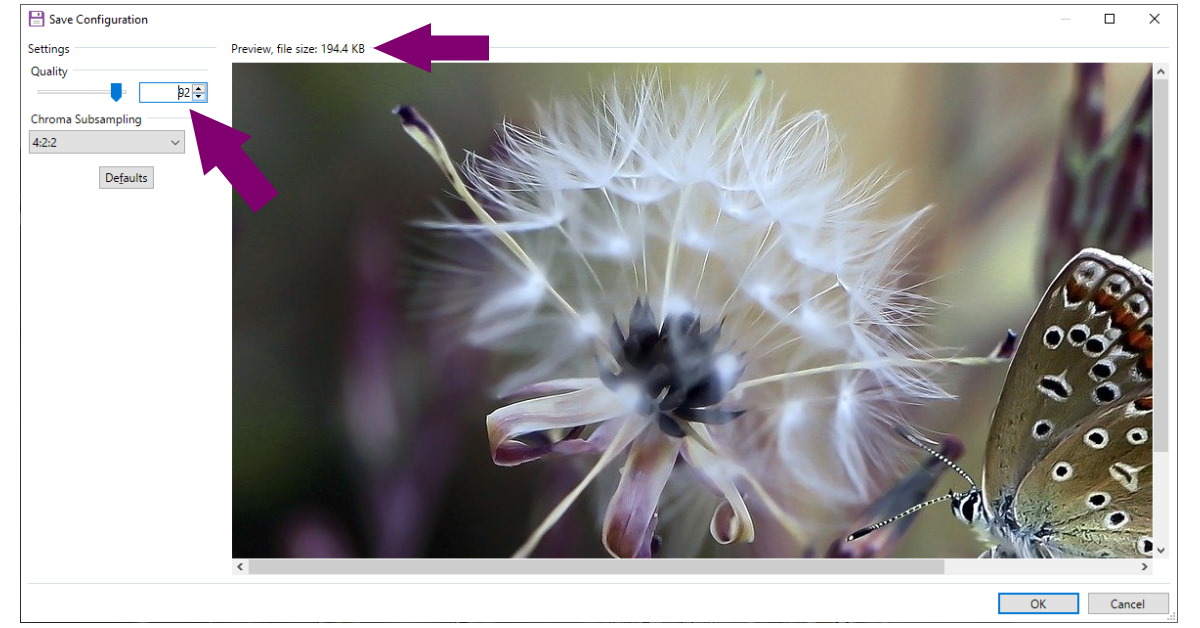
we find that changing the quality to 92% works for us at inthevendee.com, for both social media and the website. In this case it reduced our image size to around 195kb. But you can reduce until it's acceptable looking. We wouldn't go much past 300kb. Save it as a JPG for smaller file sizes, PNG when you need transparency or exact quality e.g. for printing purposes.
With these tips in mind, BE CONSISTENT across website or social media!
Psychology is very much a part of our online success. If button colours are important to make people click on certain content, how do they feel about images, the colour-tone in images, and from food, to landscapes, to places to stay... how consumable is the product, will it make the user want to buy from you or book your holiday cottage or visit your area?
No matter the format of your online business presence, whether Facebook, Instagram, and/or a website, the goal is to represent your business or services with good quality images.
Imagery can cause an instant click in the web-user's mind. Time and time again. It explains why travel -and food photography has become so important online. Do you feel like that's not you? We don't want you to worry! There are simple things you can do to raise the visual impact of your online business platforms, social media and/ or website. They are, after all, the windows to your services. Our tips and tricks are especially written for people who feel overwhelmed by the digital side of the business. They will help you to bring various shop windows from amateur, to professional; and help boost your picture repository to use for months to come!
Have fun practicing and let us know if you need assistance!
Share this Post